Materials needed: Wood, dowel rods, glue, paint, drill, drill bits, saw, screws
This project is rated as: DIFFICULT

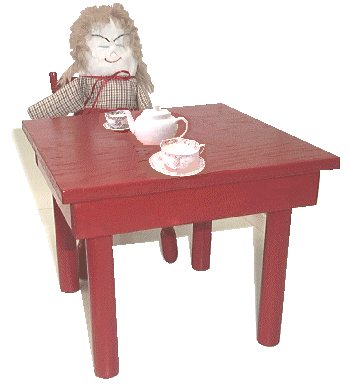
This project requires a fair amount of wood working skills. A child's chair was the subject of an earlier project. The chair was sized for a small child. As a child grows larger, the chair will be too small for the child. However, the chair can be used for a doll. A table is the subject of this project. It can be used with a doll (or dolls) and a chair (or chairs.) For example, it can be used for a tea party as illustrated.
You can make the table any size you desire. However, if it is to be used with one of the chairs described earlier, the table height should be 8.5 inches. In the above picture, a square table is illustrated that is 10.5 inches on each side and the top is made from a piece of one-half inch thick plywood.
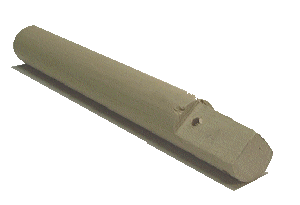
If you have a lathe, the legs can be turned with a square top and any shape instead of a straight cylinder. In this example, the legs are made from one inch diameter dowels. (The legs could also be made from square stock.) Cut four legs, each 8 inches long. The top ends of the legs need to be modified so they may be attached to the skirting.
On one end of each dowel, draw a line that is 3/16" at its center from the outside edge of the dowel. At a right angle to that line, draw another line that is also 3/16" at its center from the outside of the dowel. Saw along each of the lines parallel to the length of the dowel to a depth slightly less than the width of the skirting (in the example, 1 3/16".) Then a cut is to be made perpendicular to each cut at the bottom of the cut to remove the side pieces. In this example, 1 by 2 stock (actual size is 0.75" by 1.5")is used for the skirting. The picture below shows a completed leg:

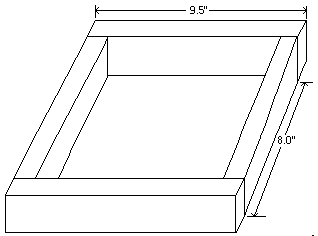
In the illustrated table, the table top overhangs the skirting by one-half inch. This means that the skirting will be a square with each side measuring 9.5". To make the skirting, cut two pieces of 1 by 2 that are each 9.5 inches long. Since the skirting is 0.75 inches thick, cut two other pieces that are each 8" long. Assemble the skirting as shown in the following illustration:

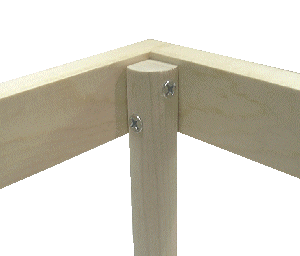
Note that the longer pieces are on opposite sides and the shorter pieces connect these sides to form a square. I suggest that the sides be attached using glue and one or two 4 penny finishing nails. Be sure that the skirting is square. After the glue sets, you may then attach the legs. The following illustration shows one leg attached in one corner of the skirting.

Note that 2 screws are used to attach the legs. In the example, 1 1/4" length screws were used. Two holes (the diameter of the screw body) were drilled in opposite faces and in opposite ends of the square part of each leg. Each leg was then positioned in a corner of the skirting and the location of each hole was marked on the inside of the skirting. Then, a smaller hole was drilled part way into the skirting at each marked location. Then the legs were attached using the screws.
The skirting and legs are then attached by screws from the underside of the skirting into the top. Only two screws are needed to attach the top. Be careful that you use screws that are long enough to go through the skirting and into the top, but not too long so that they penetrate the top. Put the two screws through the center of each of the long pieces of skirting.
After the table is assembled, you can paint the table any color that you desire. (Optionally you can add decorative touches such as decals.)